Wednesday, September 19, 2012

CAMPAIGNS IN IBERIA

SOLVES A PROBLEM Part 2 (Finis)
----------------------------------------
Date: 25 August, 1810/2012

Location: Between Almeida and the Coa River Bridge

Rules: Batailles de l'Ancien Régime {BAR} adapted to Napoleonics

Situation: An outnumbered British force at first stands to fight and then must scramble to the Coa River Bridge to escape.

For Part 1 see: http://barnapoleon.blogspot.com/2012/09/campaigns-in-iberia-solves-problem-date.html

------------------------------------

PREVIOUSLY AT THE COA RIVER BRIDGE

We left Captain Magoo's unsupported 5th Foot Grenadier Company about to receive a charge from French Dragoons. The French arrived unmolested solely because for a time they were unseen by officers one inch tall down on the table in the British main battle line. Those metal fellows had to first see the threat develop, write a message about it and send a courier to reserves to react. Then reserves had to comprehend orders and act properly. Thus, several turns transpired whilst the French galloped for the bridge. A success for them there would close the exit route for the British Army. A humiliating disaster was pending.

The natural delays above were important because Captain Magoo's situation would not have otherwise happened. Towering above the tabletop I saw the French coming. I could have unrealistically sent British forces to the area very early in the game. However, I held my reserves back waiting for orders to move.

We also had sighting rules. Officers in the main battle line were required to throw percentage dice to observe enemy forces far away. Luckily they did. However, our isolated grenadier captain failed every opportunity to see the threat developing. He was therefore named Magoo after the nearly blind cartoon character.

Now back to the game.

Captain Magoo finally sees the French cantering toward his men.

Magoo: "Stand quietly boys and do your duty. The French are coming. Make ready!"

Magoo: "Present. FIRE!"

In spite of losses, the dragoons crashed into the grenadiers and a melee was fought. Elsewhere....

Reserves were finally reacting. The horse artillery battery deployed and the light cavalry brigade arrived. Without a courier this could not have happened. Without natural courier system delays this would have happened much earlier.

Now officers on the spot take charge. The horse artillery battery shifts to the right, fires and limbers move back allowing the light cavalry to wheel right and head for the Coa River Bridge.

Right Flank British forces more forcefully attend to securing the bridge. A French lancer regiment is greatly reduced at the top of the photo and a second squadron of French dragoons is not ignored either. Lord Paget's Light Cavalry Brigade canters forward in a column of squadrons.

As Captain Magoo fights his melee at the other end of the bridge, the 15th Hussars engage the French.

We turn around to see things from the other side of the bridge. The eventual result is French forces are defeated, the bridge is secured for now and....

The light cavalry wheels left to pursue fleeing enemy cavalry to the French Back Table. The bridge off image to the middle right is safe for now.

The cleared exit route enables the retreat to commence. Note Captain Magoo's grenadiers to the right of the bridge. He lost three miniatures. "Oh Magoo. You've done it again!" However, let us turn our attention away from the British Right Flank to....

The British Left Flank where French infantry surges toward the red coats.

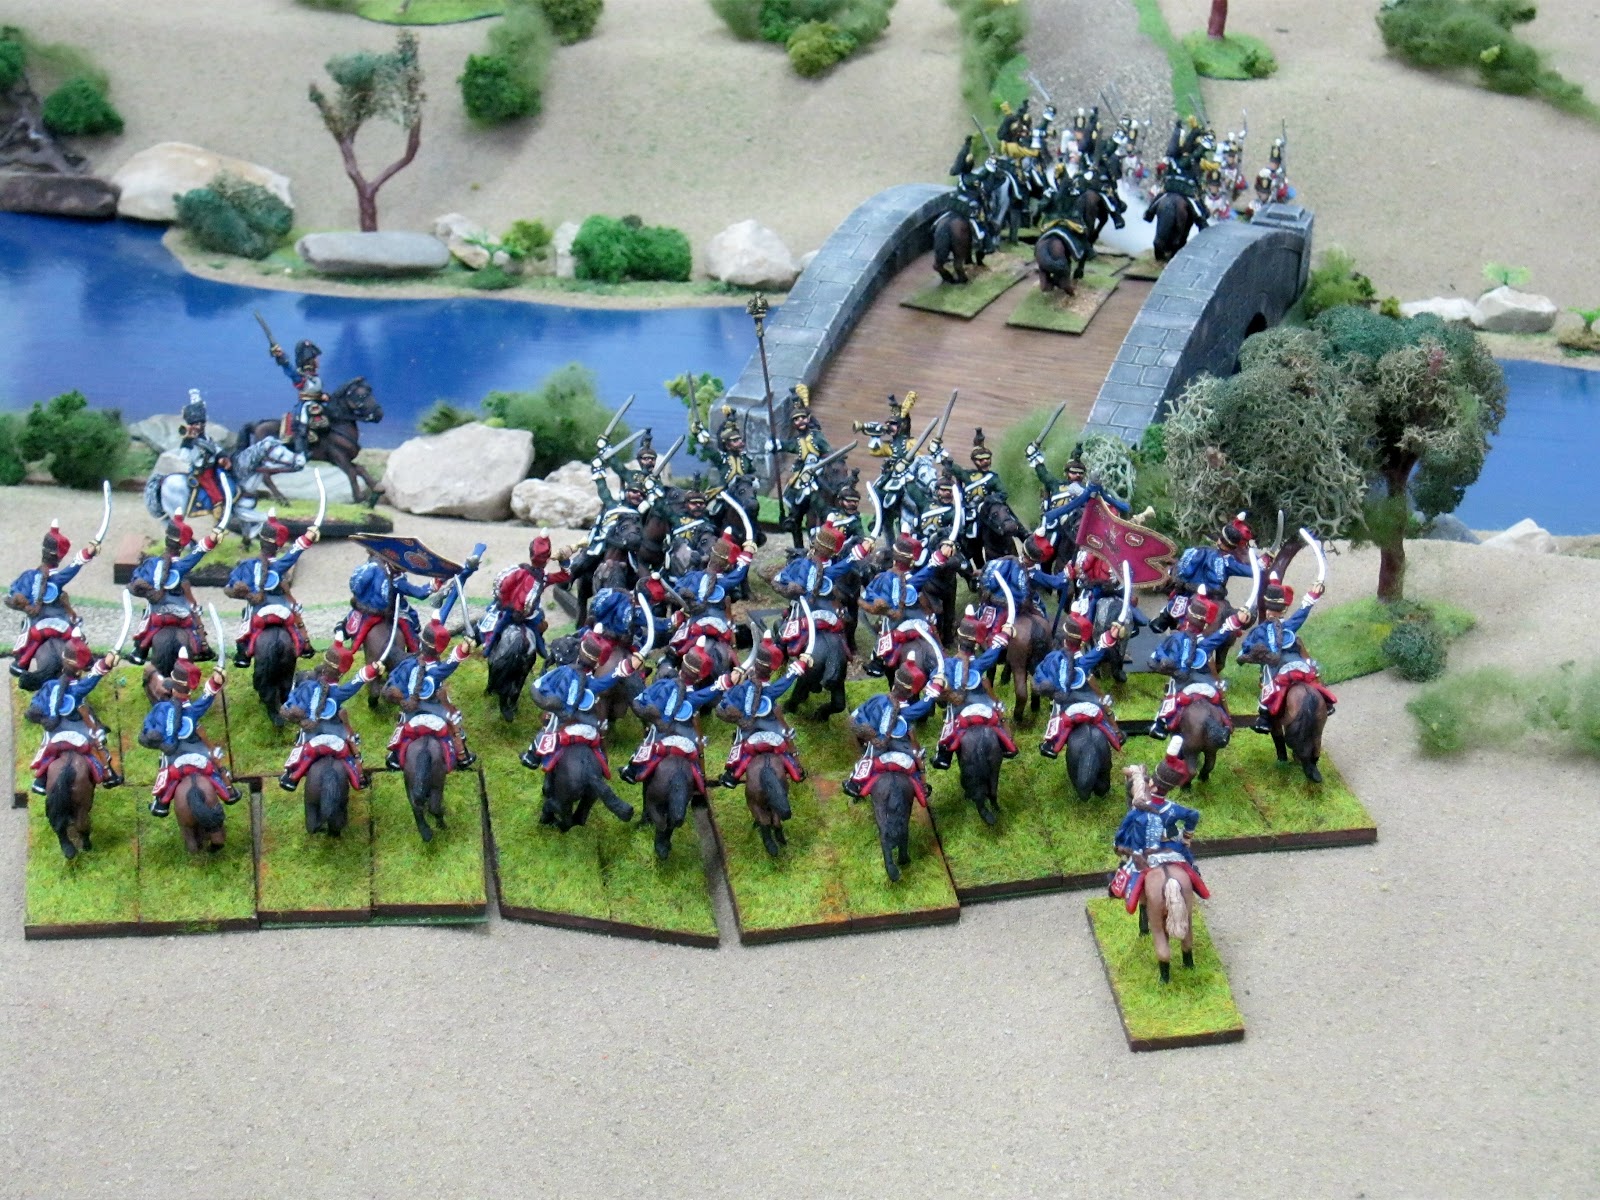
Two French battalions to the left of the previous image also move forward.

The French can not be stopped and so....

The British retreat toward the Coa River Bridge.

The retreat continues behind a walled hacienda.

While the French assault it.

A stand is made behind the hacienda.

The British edge backwards though a foothold in the hacienda exists.

The loss of the hacienda is inevitable.

Expecting the French soon, the British horse battery turns to engage the flood of French while....

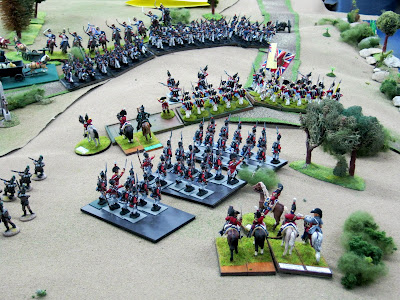
A final British line is established in the upper right of the image. We have returned to the British Right Flank.

As we turn around to see part of the attack from the British perspective.

To the right of the previous image things are even worse. French infantry are closing in on the bridge off the lower left of this photo. A baggage train has also been lost.

There is one glimmer of hope left. If you recall the successful attack by the Light Cavalry Brigade, the remnant of the 15th Hussars reformed behind French lines near the river on the French Back Table.

The 15th crossed back onto The Main Table and gallantly charged a French battalion in the rear to help. The latter about faced the third rank to shoot at the horsemen; easily done with individually based miniatures. However, the 15th was too weak to penetrate the foe, was repulsed and so....

The horse battery cantered across the Coa supported by Captain Magoo and a few more of the 9th Foot. Not much else escaped though....

Lord Paget exited the battlefield earlier with the 16th Light Dragoons and his personal troop of the 7th Hussars.

Our companionable participants observe the last British to cross the Coa. From left to right: John B., Jeff H., Earl K., John M., Jim P. (Der Alte Fritz), yours truly Bill P. and Chris K.

French players are in blue. British players are in scarlet.

Congratulations to the French!
--------------------

CLOSING REMARKS

1. This scenario was adapted from information generously given to Jim and I by Charles Grant. He has a winner here. Look for optimum details in his upcoming Wargaming In History - Peninsular Actions available before Christmas 2012.

2. Jim and I like this scenario a lot and will replay it on 10 November with seven participants. Between now and then new British and French forces are being raised. 

3. The terrain mat and river were custom-made by The Terrain Guy in Texas, USA. Put just about anything underneath to create gently rolling terrain. The bridge is from Miniature Building Authority. The lovely large trees were made by H.G. Walls.

4. Comments welcome below.
----------

Friday, September 7, 2012

CAMPAIGNS IN IBERIA
SOLVES A PROBLEM Part 1
----------------------------------------
Date: 25 August, 1810/2012

Location: Between Almeida and the Coa River Bridge

Rules: Batailles de l'Ancien Régime {BAR} adapted to Napoleonics

Situation: An outnumbered British force at first stands to fight and then must scramble to the Coa River Bridge to escape.
------------------------------------
TACTICAL ORDERS AND COURIERS
There is a problem but not like you might think.

When gaming pards become highly skilled in deployment, maneuver and rules, it becomes harder to surprise each other. Unforeseen and entertaining blows become fewer and fewer because both sides have become nearly evenly matched. Parries are frequent. We know each other too well.

One more thing and this is BIG. As players we tower above the tabletop seeing everything. It therefore becomes even easier to counter enemy plans. Legerdemain almost entirely vanishes. Players on one side often huddle to change plans, move reserves or do just about anything to impossibly stop the foe in unrealistic moments.

The solution is to introduce Tactical Orders and Couriers. What does this entail?

1. Each player is given a mission such as take the hill, use refused wing tactics, swing wide right, hold the village area, etc. These are Tactical Orders. Obey them.

2. Each player is represented by a miniature officer. You as that miniature officer will honorably make decisions only about what that little fellow can actually see or be told down on the table.

3. Each player will have couriers to send orders, information, ask for help, etc. It is important couriers are well-mounted and skillful riders simulated by double or treble light cavalry open order speeds. Thus, if centrally placed commanding General Alexander perched atop a high hill can actually see a dangerous enemy move on a flank, he can write a message, fold and place it under a courier and send off the galloper to the reserve to order a static regiment to the flank to help. The officer receiving the message can react the turn after receipt.

Let's see how this was reflected in the following game.


THE BEGINNING
Stand quietly boys and do your duty.
The French are coming.

Two kilometers to the left of the quiet Coa River Bridge is the Fortress of Almeida. Between the two we played a fun, stimulating and companionable 1:10 Napoleonic game in Iberia. This bridge was British extreme right flank.

Meanwhile near Almeida French line infantry and chasseurs a cheval busily approach the British extreme left flank held by riflemen.

 The same riflemen view the French advance.

Deeper inside the left flank is Der Alte's new 94th Regt.
Note distant riflemen of the previous two images.

Center: Major General Pettygree, staff,
more riflemen and the 9th Regiment.

A later view of the same rifles and the 9th Regt.

Better view of the 9th. Regt.

British Horse Artillery Battery on the unopposed right flank.
This would soon change.

The Coa River Bridge on the extreme right flank.
Captain Magoo's 5th Foot Grenadier Company
guards the bridge.


The End Of The Beginning
In the beginning French forces were not allowed to deploy opposite the British right flank. They instead deployed opposite the British left and center. Reasons were because French numbers nearly doubled those of their foe. The British did not need the French appearing everywhere! Plus, the French were not initially posted there historically. That soon changed.

As Polish Lancers shockingly arrived to disrupt a supply train heading for the bridge. The bridge is to the upper right of the image less than two feet away.

They were followed by two squadrons of French dragoons making for the bridge. You can just see a corner of the bridge in the upper right of the photo.

One squadron then turned to canter up and over the bridge. Would the other squadron follow and burst through Captain Magoo's unsupported Grenadier Company? Afterwards would the French dismount closing the British escape route?


Now Back To The Problem And Our Solution

This closer view of the 9th Foot reveals two mounted officers. The green jacket officer in charge here spotted a brigade of enemy cavalry crossing his front left to right about four feet away. He decided to send a courier shown with a message under the horse to his rear alerting....

The horse artillery battery to move forward and deploy to protect the right flank. Note the courier in the upper right of the photo. The courier delivered the information and then rode to the rear several more feet to advise Lord Paget to bring his British light cavalry forward as well.

Lord Paget obeyed. The 15th Hussars led the 16th Light Dragoons from the British Back Table to the Main Table on Turn 4.

On about Turn 5 the artillery is unlimbered and the light cavalry has arrived to act.

Here's the thing. As Bill, I knew French regiments of cavalry were heading for the British right flank on Turn 2. I could have shifted the artillery and Paget's cavalry earlier than turns 3 and 4. I did not because the officers on the table had to discern what was happening from their perspective an inch above the table, a courier needed dispatching and recipients needed time to react. Thus, real world reasonable delays were built into my response.

As a result, Captain Magoo's grenadiers were feeling very isolated and lonely. Nobody else was there to stop a French breakthrough. Had I not played the game with delays described, this moment would never have happened. Paget would have gotten here before the French dragoons cantered onto the bridge and this exciting moment would never have occurred.

Come back next time to see what happened!


Closing Remarks:

1) Some of the information for our scenario was personally provided by Charles Grant, "from his next publication, Wargaming in History - Peninsular Actions  -  which will be out well before Chritsmas." Jim and I sincerely thank him for our adaptation of his Coa Bridge scenario. We like this scenario so much we plan do it again in two months. Seven players are needed for our version.

2) See: http://www.napoleon-series.org/military/virtual/almeida/c_almeida.html for information about The Fortress of Ameida and its geographical and tactical importance in the region by Robert Burnham.

3) Most miniatures are Elite Miniatures: http://www.eliteminiatures.co.uk/products.htm Others are from Peter Gilder's Connoisseur available from Bicorne Miniatures: http://www.bicorne.net/catalog/index.php?cPath=292_102&osCsid=8cb021725bf323ebc47d14d244f1449d

4) The bridge is from Miniature Building Authority: http://miniaturebuildingauthority.com/index.asp

5) Your remarks are very welcome at "Comments" below.

Sunday, July 24, 2011

16th Light Dragoons

My first Peninsular British unit will be the 16th Light Dragoons. The prototype is below. The coat is darker on the miniature than in the photos - as it should be. The casting is from Elite Miniatures.
Bill


Monday, July 18, 2011

Scneario Ideas

HOLDING ACTION (Bill)
Smaller British force uses maneuver and spoiling cavalry attacks to slow, delay or hold off a larger oncoming French force. Fighting withdrawal kind of thing. Play lengthwise similar to 16 July 2011 SYW Battle of Waldeck. Lots of undulations, line of sight breaks, scattered structures, etc. Possibly a bridge to protect for as long as possible for some reason. Also refer to Sittangbad in CHARGE.

By early 2012 there should be Bill's 48 British light cavalry and Jim's 83rd Foot, RHA (3 guns), several rifle companies and possibly some other British/Allied infantry. Lots of French already exist.

16 July 2011
----------

CRUMBLING/LIGHTLY WALLED VILLAGE (Jim) 
Form a perimeter for light defenses for the British somewhere in Spain. Back story: something along the lines of a small mobile mixed force brigade has been posted in front of or on the flank of Wellington’s main army, or it is an outpost that both acts as a headquarters for the intelligence gathering Corps of Explorers or a trip wire for any approach march of the French army. I seem to recall that there was an abandoned Fort Concepcion between the two lines that was occupied at various times by various forces.

Bill has lots of MBA wall sections that come in two pieces.

16 July 2011
----------

Thursday, June 30, 2011

15th Lt. Drag. Sources

Bill's Temporary Storage Notes: Will Be removed
----------
See whopper source
http://www.napolun.com/mirror/napoleonistyka.atspace.com/British_cavalry.htm#britishlightcavalry
----------
Uniformed as hussars converting to the fur busby in 1807. Tarleton before from a 1799 engraving of another hussar regiment in Holland.

Battle of Sahagun 1807 - NW Spain:
Sir Henry Paget with 12 of his 7th Lt. Dragoons as his personal escort commanded a brigade of 10th Lt. Drag. and the 15th Lt. Drag., both uniformed as hussars.

The 15th started with 900+ lads in England before sailing for Spain. Apparently 730+ landed in Spain.
---
2011 Plan:
1st Hussar Brigade: Two regiments of two squadrons + a commanding officer each = 50.
Lord Paget, his escort + Gen. William Justinian Pettygree and staff in multiple poses.
Complete before January 3, 2012.

2012 Tentative Plan. Add?
Two more light cavalry squadrons.
1x British Bn. march attack pose.
Miniatures for vignettes from above units.
British heavier cavalry.
---
1st Hussar Brigade (Lord Paget)
7th Hussars
10th Hussars
15th Hussars
Royal Horse Arty. (2x troops)
----------
15th LD Reenactment Unit
http://www.xvld.org/index.html
----------
Eilte Miniatures:
http://www.eliteminiatures.co.uk/CAVALRY,%20ARTILLERY%20AND%20GENERALS.htm
Tarletons only and BIG castings
----------
Front Rank Battalion Packs
http://www.frontrank.com/lev4_2_1_5_British_Battalion_Packs.asp
or for photographs
http://www.frontrank.com/lev4_2_1_2_British_Cavalry.asp?startnum=9
----------
Bicorne Connoisseur
http://www.bicorne.net/catalog/index.php/cPath/292_102_142_144
See pp. 1-2 of this listing.
----------
Foundry
http://wargamesfoundry.com/historical_ranges/single_packs/napoleonic/british/?sector_id=5
----------
Hinchliffe
http://www.hinchliffe.co.uk/LIB/2061.JPG
and
http://www.hinchliffe.co.uk/LIB/2092.JPG
----------
Vitrix Colonels Bicornes
http://store.warlordgames.co.uk/victrix-mounted-british-penninsular-colonels-and-foot-pioneer-2345-p.asp
----------
UNIFORMS
---
Painting lace:
"I hesitate to offer painting advice on this board, but for me lace is

quite easy these days. Paint the lace colour all over, run a wash over the area
in the uniform colour, and then lightly drybrush or paint
back the lace. It is not display quality, but it is quick."


Seventh Hussars
white cuffs

Back in England George, the Prince of Wales, was the arbiter of all fashion and as such he decided to bestow first on his own regiment, the 10th, the distinction of being Hussars in in 1806. Lord Paget, now Colonel of the 7th Hussars was a friend of the Prince and thus the 7th were the second regiment to be granted the magnificent uniforms in the same year. In October 1808 the 7th Hussars embarked for Corunna to reinforce Sir John Moore's Army. A bleaker could not have been foreseen. Moore had started the retreat before the 7th Hussars had reached the Army. Two minor conflicts brought the cavalry some renown during the retreat, the first at Sahagun in which two regiment of French Cavalry were overwhelmed, the second at Benavente when the over-enthusiastic leading elements of the French advance were pushed back into the river they had just crossed.

---
Tenth Hussars: http://nuzhdin-v.euro.ru/zg0272.htm
---
Fiftheenth Hussars: See reenactmnet site above.
Wearing the tarleton in 1808 based on the 7th's uniform history  just above might do.
But this site says NO: See two color photos:
http://www.xvld.org/conversion-to-hussars-1805-7.html
----------

Easy Attrition System

BAR SPAIN

One of the things I do with the Pettygree order of battle on the NW Frontier is, units start with BIG #s of miniatures (paper strength) and gradually become smaller via attrition. My 66th Foot started near 100 miniatures and now is less by about 20 chaps.

An attrition system needs to be generous to the units so they don't become skeletal
and
most important --> it needs to be verrrrrry easy on Jim/Bill!
---

Easy Attrition System:
After a game throw 1D6 per unit that had losses.
(Minimum result = 1 and Maximum result = 6)

1.  You HOLD the field or the game is a draw recover:
1= 70%, 2= 75%, 3-4= 80%, 5= 85% and 6= 90%.

2.  RETREATING FROM the field recover:
1= 60%, 2= 65%, 3-4= 70%, 5= 75% and 6= 80%.

Modifiers:
Poor supply situation, July or August, poor quality soldiers (Spanish or militia?) -1. (only one can be used)

Arty., Cavalry and Elite Companies +1 (only one can be used)

Captured prodigious amounts of supplies +1
-----

KIA, MIA, In Hospital and Replacements BOX
Miniatures that remain casualties are placed in a KIA, MIA, In Hospital and Replacements Box.
Actually place these soldiers in their own box as the easiest way to track this. No paper! Some will eventually return. See below.

Some lost combatants should be added before a next game.
Throw 2D6 for a big unit and 1D6 for a small one. The result is the number of replacements arriving from the KIA, MIA, In Hospital and Replacements Box.

83rd Foot Example:
2D6 = 7. Seven miniatures go back to the 83rd Foot.
----------

Tally Ho!
Bill
30 June 2011