Sunday, May 31, 2009

Lessons in Combined Arms Attacks


The master teaches the French a lesson in combined arms attacks.

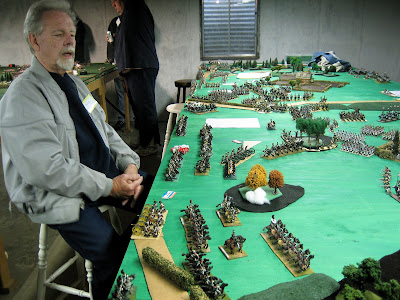
Soldiers! Take a good long look at the picture above and watch a master at work as he plies his trade of generalship. See how he uses combined arms to discombobulate his opponent. His cavalry has the French infantry forced into squares, while he brings up his horse artillery to fire on the squares, which will suffer greatly from the close range cannister. The master makes you react to him.


Cavalry, artillery and infantry all threaten the French square next to the woods.

Soldiers! I give you yet another example of the master's use of combined arms in his attack. Again, we have the French infantry formed in square due to the presence of his cavalry. We also see a battery of artillery that is close enough to decimate the square. Coming up behind the artillery, we can see the arrival of his infantry. His battalions in the enclosure will soon march forth and finish off the square with musketry, if his artillery does not do the job first.


A doomed artillery battery.

Soldiers! Take a look at this picture and observe a fatal error. The Emperor's Beautiful Daughters (artillery) have their flank exposed to the Russian dragoons (see the picture at the top of this page - the squadron of Russian dragoons at the bottom of the picture will have a clear charge into the flank of the battery). Why? Because we did not keep any cavalry on hand to screen the front of our guns until they could deploy. If the guns must be posted out in the open, then they must be anchored on a terrain feature such as woods or buildings, or in the absence of that, then post a battalion of infantry in square on each flank of the artillery.

This battery will certainly be lost at the beginning of the next turn. This will trigger morale checks by all infantry within 12" of the fleeing gunners. Each morale check will have a -1 for each friendly rout seen on that turn. If a second unit routs as a result, then all remaining battalions will thus have a -2 for having seen two routs. And so on and so forth. All infantry in the vicinity of this battery must form square as this will add a +1 or +2 to morale and thus negate the effect of seeing the rout.

Your Emperor can always find cavalry. He can not obtain any more artillery. Artillery is sacred in this game and it must not be lost. Use up your cavalry, no matter how hopeless it may appear. One single squadron of cavalry must attack and at the very least, the opponent will get a "Return to Own Lines" result. Your Emperor was most distressed to see fresh squadrons of cavalry voluntarily retiring behind the infantry squares. You might even get lucky and find that your single squadron wins the melee, routs the opponent and rallies or pursues like Davout's cavalry did on the left flank on the last turn.

Lessons have been learned. A successful general learns from his mistakes and he copies the successes of his opponents. Your Emperor has confidence that we will all do better tomorrow. Think about what you can do to put the pressure on Uncle Duke and Kurt (British).

Artillery Resupply
The rules provide for ammo resupply via the simple expedient of the gun battery doing nothing for two consecutive turns. Doing that replenishes all of your original ammo. So when a gun runs out of ammo and it is at risk, it shoud be retired to safety.

Horse Artillery
In these rules, horse artillery is an offensive weapon and makes for a lousy defensive weapon. Its rapid movement allows it to move up close to infantry and fire at them with cannister. If it hasn't moved, it can double fire. Randy, your two horse batteries should be used to support an attack. Move them up with cavalry support and hose down the British, then follow up with an infantry attack of 4 to 6 battalions. The infantry can finish off the weakened opponent.

Our Going On the Defensive Strategy???
Our center and right are on the back table. There is no more space for retreat. We must not give up any ground from now on. I see that the British are advancing in a timid and somewhat reckless fashion. It is time to smite them now that they are over the hedges and walls and out in the open.


The British are now out in the open. This advance looks to be done in piecemeal fashion. Do we have any cavalry nearby, or horse artillery?


These fellows look a little bit vulnerable as well.


Wednesday, May 20, 2009

Accidental Meetings Per Jomini And Us


Colonel René Chartrand's 1/51st leads 2/51st de Ligne in Germania. Both are in BAR "Closed Columns of Divisions." Each battalion has three divisions front to back. The divisions are separated by perhaps 1/2" simulating actual historical intervals. This formation is good for infantry combat. However, because the divisions are so close together, forming square will take more time.


Notice intervals front to back. This is a dangerous formation if cavalry suddenly appears.


Excerpts from The Art of War by Baron Antoine Henri de Jomini. "The accidental and unexpected meeting of two armies on the march gives rise to one of the most imposing scenes of war. A great occasion of this kind calls into play all the genius of a skillful general and of the warrior able to control events. There is so much chance in these accidental battles that it is by no means easy to lay down precise rules concerning them.... [When meeting unexpectedly, one can,] do nothing better at first than cause their advanced guard to deploy to the right or the left of the roads they are traversing. In each army the forces should at the same time be concentrated so that they may be thrown in a proper direction considering the object of the march. A grave error would be committed in deploying the whole army behind the advanced guard; because, even if the deployment were accomplished, the result would be nothing more than a badly-arranged parallel order, and if the enemy pressed the advanced guard with considerable vigor the consequence might be the rout of the troops which were forming. The advanced guard must always be halted and formed, and then the mass of the troops concentrated in that direction which is best suited for carrying out the object of the march. Whatever maneuvers the enemy may then attempt, every thing will be in readiness to meet him." Pages 207-208.

In the game to be resumed on the 30th, we are compelled by Jomini's advice to form now to be in readiness to engage the foe. Unless ordered to the contrary that is what my infantry corps will do. Surviving cavalry will rally behind for later service. The question remains if I should continue to press forward to occupy the field on my right flank beyond which is the left of the corps commanded by Randy. I am told this is important to do but it is an exposed salient.

It seems a reasonable request on my part to ask that the Austrian battery to my front be withdrawn given umpire error in my initial attack. Keith mentioned he adjudicated it wrongly and that the battery should have suffered severely with probable loss of morale and retreat. However, as in baseball, the ruling will perhaps stand. I am content either way. It may be almost out of ammunition anyway.

Bottom line: My best bet is to form my corps on the back table and afterwards move forward or to await an enemy attack. I can occupy the above-mentioned salient or not pending orders.

Votre serviteur,

Bill

To finish my story about columns when cavalry is near, see the following sequence.


1/51st de Ligne in BAR "Open Column of Divisions." The interval is about 3".


The lead division halts. The second division wheels its two companies outwards. The rear division continues to march forward.


The sides of the square are formed while the rear division about faces. The result is a fast way to form a hollow square and give fire on the ever-approaching lancers. Forming a square from a "Closed Column of Divisions" takes longer.

Tuesday, May 19, 2009

French Recon Report For May 30th Battle


Russian lancers (8 sqds) advancing on the French left wing.

Welcome to our new blog devoted to photos of our Napoleonic wargames using In The Grand Manner rules and a new set that is in the development stages.

Without further ado, let us see what information our vedettes have brought back to l'Emperor about the dispositions of the Allied army. Click on all pictures to enlarge the view.

Russians Attack the French Left (Davout commanding)


Davout's corps arrives from the left and has to cross the unfordable river, where it is forming up behind the ridge. Light cavalry screen the marching infantry. The enemy can not charge as long as the French stay hidden behind the hills.


Russian cavalry corps attacking Davout's position. I count 6 sqds of cuirassiers, 6 sqds of hussars, and 8 sqds of lancers in addition to a horse artillery battery.


Another view of the Russian attack. A sqd of French dragoons and Russian cuirassiers have completed their initial combat, with both retiring back to their own lines.


Russian-Austrian Attack on the French Center (Murat commanding)


Derek's Russian cavalry attack to the right of the main town that we are all fighting over. You can see some Russian cavalry returning to their own lines after a melee that they won.


More of Derek's Russian attack in the right center (our left center)


Murat's light lancers are pinned by the routing lancer unit at the top of the scrum. Note the single Russian cuirassier squadron on our side of the table. It is directly behind our double battery placed on the hill and is a critical threat. The Russian unit could turn and charge a turn later, or it could charge into the mass of lancers first. But compulsorary moves come first and so maybe the lancers can rout of charge range.


The Austrian cavalry and horse artillery are holding a position in front of the main town.


The developing battle for the farmyard in the center of the table. You can see the doomed Austrian 12-pounder battery that is going to get hit in the flank on the next turn. In the upper right corner you can see the head of the Austrian infantry corps in column that is advancing into the center.


The rest of the Austrian infantry corps marching up the road towards the farm yard area. In the background you can see the arrival of a British corps as well. The picture does not show a second Austrian infantry corps moving up on the town in the center.


A view of the French forces about to enter the critical farm yard area.


Bill's infantry corps posted to the left of the center road and behind the ridge where his artillery is deployed. The troops are in square to fend off the Russian cavalry.


The other half of Bill's corps on the right side of the center road, positioned to attack the farm yard. A few squadrons of French cavalry are trying to get over to cover the hole in the center, but they're not enough.

The French Right Wing (Randy) Attacks the British


British far left flank covered by a farmhouse and enclosed yard. British unit in right hand corner behind the square is a 40-figure Guards regiment.


British infantry corps are beginning to occupy the farm house and yard. We won't be able to take it from them.


British have deployed a horse battery and are bringing up a second battery behind the hedges. Riflemen are heading into the woods on the left.


Randy's grand battery is unfortunately masked by two battalions of infantry. We must get these two units out of the way. They are not enough to attack the British position and only serve to screen the guns. The foreward most unit is a lost cause and will rout eventually. The second unit might be able to get safely out of the way.


Randy's corps marching on the road.


Another view of the masked French battery. Kieth suggests that we occupy the woods with our skirmishers at all costs before the British do. It covers the flank of any attack in that field.

Conclusions
We potentially have a big hole in our center, and there are 2 Austrian and 1 Russian infantry corps marching to the center town. Bill has a corps of infantry in the center and the Bavarian corps will be marching onto the table in our center, rather than on Randy's road. Potentially the Old Guard corps will also end up here, but can we get positioned soon enough.

Davout will have his hands full on the French left and it is probably best to play defense in this sector rather than try to attack.


ff